


Contact our support team for more information.
Guardian Sync Properties™ allows you to centrally control your standard properties in the cloud. With these features, your standard properties are stored in the cloud and synchronized across your projects. A change to a property in the cloud means that change will also be (automatically or manually) updated in the projects and families.
There are some key points of interest here related to Guardian Sync Properties:
Guardian Sync Properties provides an easy and quick way for BIM managers and Project Administrators to standardize and maintain their various project properties. Container files are no longer needed, and this also helps to save space in template files by allowing end-users to load in only the required properties.
Company standard properties can be uploaded to the cloud through any Revit file where they exist. Once uploaded, they can be maintained outside of a project file altogether.
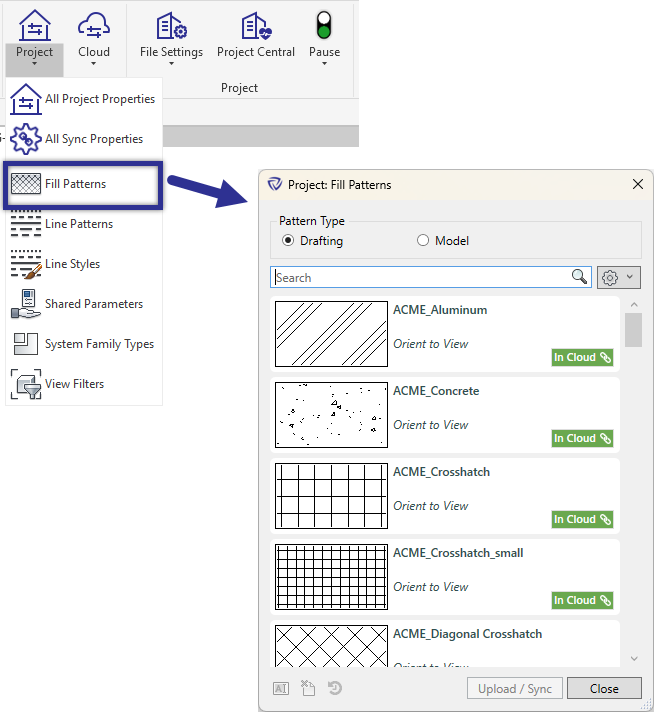
This is Guardian’s Fill Pattern dialog. Here, you’ll be able to view a clean and large thumbnail of each pattern and upload those that are truly those you wish to standardize upon. We’ve taken great care to style this to be like Revit’s, but with improvements.
You’ll be able to rename or delete patterns. When you do, Guardian will ask if you want to create a rule for that action, just like it already does elsewhere:

Also, notice that a username and date will appear on each property tile, when applicable. Guardian keeps track of all added and modified properties. When users add, duplicate, or modify patterns, you’ll see where they’re coming from. If you’d like to see more information, you can click on the history icon.

From the settings cog, there are also options available to sort the patterns by name, author, and date.
To upload, it’s very simple. Select one or multiple properties (you can shift select or use ctrl key) and click Upload/Sync. You’ll then see a dialog that looks like the below image. The patterns you have selected appear on the left. The various sync conditions with cloud properties are shown below:


Property is synchronized with the corresponding cloud property.

Property is out-of-sync with the corresponding cloud property.

Property name and contents match with corresponding cloud property.

Property name matches but the settings differ from corresponding cloud property.

Property is available to be uploaded to the cloud.
It is not possible to have multiple properties in the cloud that have the same name. When you click on one of the above icons, you will have a couple of options. Here is the dialog you see when clicking the Upload to cloud icon.

You may also click on Upload All Remaining to upload all properties in the list with the Upload to cloud icon. All other icons must be addressed on an individual basis.
Once items have been uploaded, your items may have some additional markers. If you are an administrator, these are clickable actions that allow you to modify or fix the relationships indicated.


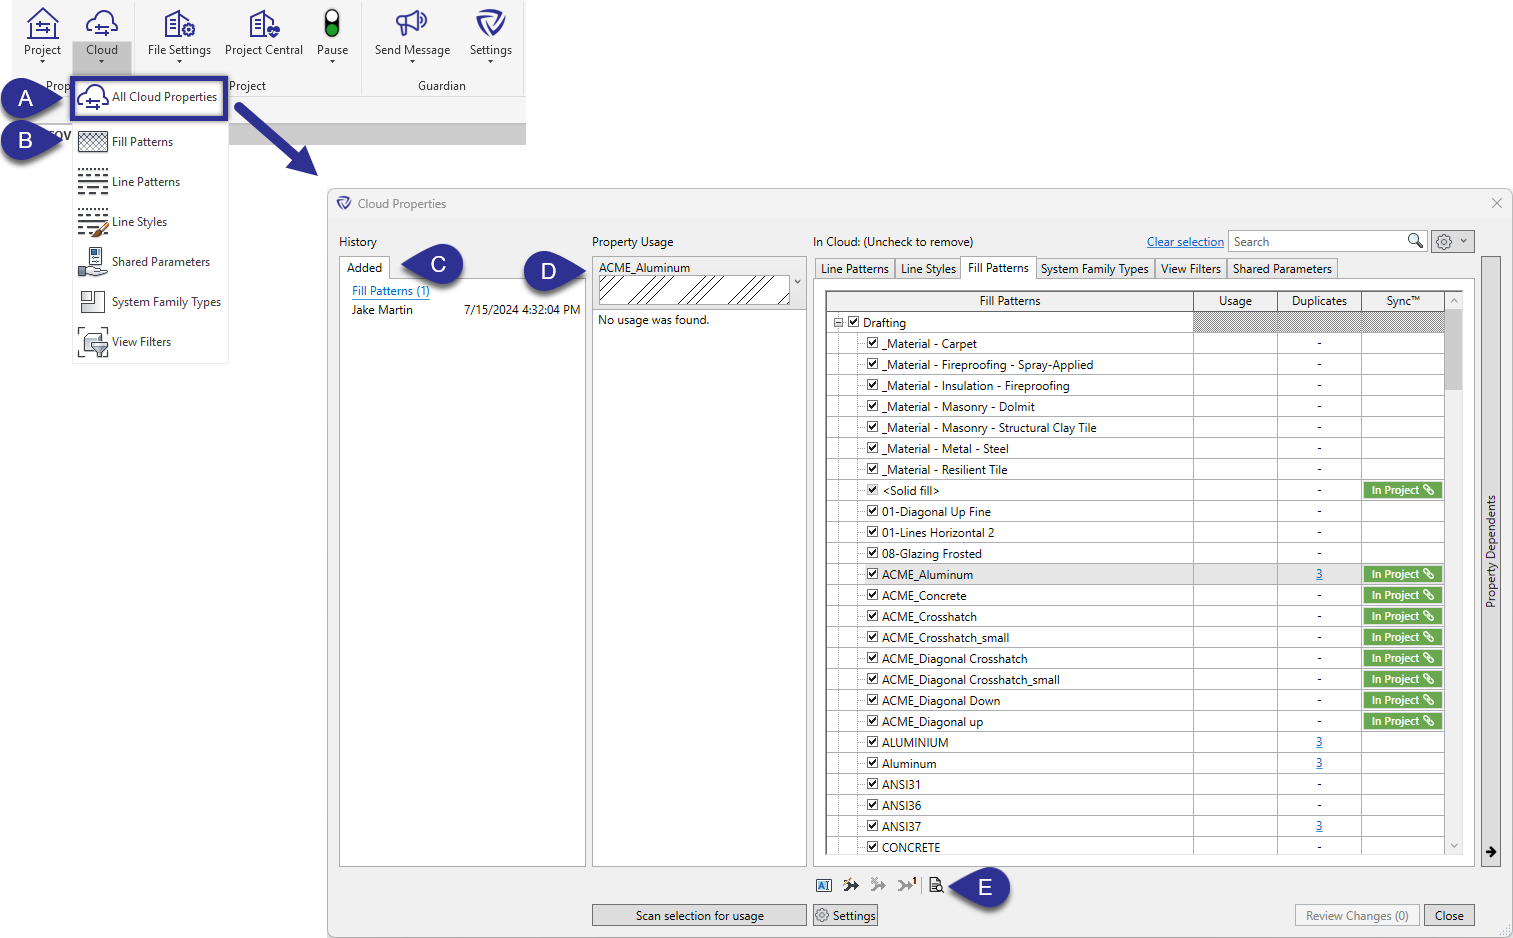
(A) By clicking on the main button or All Cloud Properties, you will be taken to this larger dialog that is very similar to the familiar Project Properties dialog. This is where you can view and manage all properties stored in the cloud. You will be able to remove, delete, rename, and merge cloud properties here.
(B) Fill Patterns will open a dialog that is very similar to the Fill Patterns dialog for the project. It will allow you to view and download/sync patterns into your projects.
(C) You will see a complete history of additions and modifications to properties in the history panel. You can click the links to view more information about what happened at that time.
(D) As more properties are added, you will be able to view the relationships between them. We’ve added a preview here to help identify each property.
(E) This will open the same dialog mentioned in B, only it shows the properties that are selected. You will be able to view and download/sync properties here.
As changes are made to your cloud properties, you will be asked if you want to create rules for those changes. These shouldn’t be confused with the synchronizing behavior of Guardian Sync Properties. Any property in a project that is synchronized to a cloud property will automatically convert, provided you have the automatic setting enabled. (See below section.)

The Cloud: Fill Patterns dialog looks and behaves just like the Project: Fill Patterns dialog. Note that there is an option to filter out patterns that are already present in the project. This is checked by default for regular users to prevent adding duplicate patterns to projects.
Also, Guardian checks your projects units and defaults the list to filter by only those that are compatible with the opened project’s units.


Using the above settings, you can control Guardian Sync Properties' automatic behaviors. Tooltips will help clarify what it will be doing behind-the scenes.
Guardian has a capability to understand if a property is the same by name and content with another property in the cloud. When it discovers these situations, it can automatically ‘set sync relationships’ so that changes in either can easily be flagged or automatically corrected. If the Automatically set sync setting is enabled, you will notice a quick progress bar appear when opening projects or loading content.
The second setting for update sync properties is very exciting because it can keep your properties in-sync with your standard automatically. It will only correct something if there isn’t a conflict.
Example: Guardian tries to rename ‘Concrete’ in the project to match ‘Concrete – Small’ in the project but cannot because there is already a ‘Concrete – Small’ in the project. This IS something that Guardian can merge, but merging is something that must be manually initiated by an administrator.
Any properties that are synced with the cloud will show the status in both the Project Properties and Cloud Properties.

If a synced property is changed in the project, or the standard is updated in the cloud, that property will show as Out of Sync (Indicated with yellow 'In Cloud').
The property can be updated to match the standard in the cloud, or push the updated property into the cloud, by selecting the yellow In Cloud button.

For the out of sync property, the relationship can be fixed, removed, or changed to a different property.
Selecting Fix sync relationship will allow the property to be fixed.

In the Difference Found dialog, this will show the properties that are different and also if there are any dependent properties.
The arrow in the center can be selected to toggle between pulling down the version from the cloud or to push the project property up to the cloud.
The differences between these properties can be seen be selecting the Compare button.

Any differences between the project and cloud versions will be highlighted.
